
canvas element to build a simple browser-based drawing tool. In this post we extend our drawing tool to allow us to add resizable and draggable rectangles to the canvas.
Introduction
This post is the second instalment of our series of tutorials in which we aim to build a simple canvas-based
drawing tool. The final tool should allow the user to select an image and add some basic annotations before exporting it again.
The tool we will build should be functional, but it will definitely not be the finished article.
I have made the tool available here, for convenience.
In the first post
we set up our page and demonstrated how we could implement a simple free-hand drawing tool using a few
canvas methods.
In this post we are going to extend the same ideas to allow us to place draggable and resizable rectangles on the canvas area. We have limited our consideration to rectangles in this post, but there is no reason that the same ideas could not be generalised to other shapes (e.g. an ellipse).
Let's recap what we are hoping to implement, and where we are now:
- Draw free hand lines on the canvas (Part I)
- Draw resizable rectangles to highlight a section of the image
- Set a background image on the canvas that we can annotate
- Add text captions
The source code for the version of the tool that we build in this tutorial can be found on this branch of the GitHub repo and the following video gives a simple demonstration of the functionality we hope to build in this tutorial.
Page structure and utilities
The markup introduced in the previous post will require a few more elements upon which we can hang our new functionality. A stripped back version of the HTML relevant for this post is shown here:
    <div id="tool_wrapper">
      <div id="control_panel">
          <div class="control_panel_section">
          <h3>Tools</h3>
          <div class="control_option">
            <button class="btn tool-btn" id="draw_tool_btn" data-active="false">✎</button>
            <button class="btn tool-btn" id="rect_tool_btn" data-active="false">⊞</button>
            <button class="btn tool-btn" id="selector_tool_btn" data-active="false"><div class="hand_pointer">☞</div></button>
            <button class="btn tool-btn" id="erase_tool_btn" data-active="false"><div class="erase_rect">▭</div></button>
          </div>
      </div>
      <div id="draw_panel_wrapper">
        <canvas id="draw_panel"></canvas>
      </div>
    </div>
    <script src="js/page.js"></script>
    <script src="js/pencil.js"></script>
    <script src="js/rectangle.js"></script>
    <script src="js/shape.js"></script>
You can see that we have added two new buttons to our tools section, these define the interaction model for our user. The ⊞ button allows the user to add new rectangles to the canvas and the ☞ button is then activated if the user wants to select an existing rectangle for manipulation.
We also include a couple of new scripts at the bottom of the page: js/rectangle.js and js/shape.js.
We will look at these scripts in more detail shortly.
Page initialzation
Let's start by looking at the page initialization. This happens in file js/page.js , which uses the
revealing module pattern
to define a global variable, PAGE. We call the init method on this module when the page
is loaded:
window.PAGE = (function(page){
  page.canvas = null,
  page.ctx = null;

  const init_global_button_handlers = function(){
    …
  };

  page.init = function(canvas_id){
    // Initialize canvas size
    page.canvas = document.getElementById(canvas_id);
    page.canvas.width = window.getComputedStyle(page.canvas, null)
      .getPropertyValue("width")
      .replace(/px$/, '');
    page.canvas.height = window.getComputedStyle(page.canvas, null)
      .getPropertyValue("height")
      .replace(/px$/, '');
    page.ctx = this.canvas.getContext('2d');

    init_global_button_handlers();
    if(typeof window.PENCIL !== "undefined"){
      window.PENCIL.init(page.ctx);
    }
    if(typeof window.ERASER !== "undefined"){
      window.ERASER.init(page.ctx);
    }
    if(typeof window.SHAPE !== "undefined"){
      window.SHAPE.init(page.ctx);
    }
  };

  return page;
})({});
This initialization sets up a reference to our canvas element, the 2D drawing context (i.e. page.ctx)
and also sets the intrinsic size of the canvas element to match its screen size, as determined by our CSS layout.
We omit the implementation of init_global_button_handlers above, for brevity. This function is responsible for
attaching some event handlers to our tool buttons, but is outside the focus of the current post.
Finally we call the initialization methods on a number of differnt modules which we have loaded on the page.
We initialize PENCIL and ERASER, which are the tools we implemented in
Part I.
Then we initialize our new SHAPE module, passing the 2D drawing context as a parameter.
The SHAPE module
The initialization in the SHAPE module will store a reference to our parent canvas and the associated
drawing context. It also instantiates a new
Point
object which we will use to translate from screen coordinates (associated with browser events) to coordinates on our canvas.
Also note that this SHAPE module keeps track of an array of all_rectangles. This is initialized to be
empty but we will make use of it shortly.
As well as initializing these references, the SHAPE.init method will also set-up handlers on the add-rectangle
button (⊞), and the selector button (☞).
window.SHAPE =(function(s){

  let ctx = null,
    canvas = null,
    p = null,
    all_rectangles = [];

 …

  s.init = function(context){
    ctx = context;
    canvas = context.canvas;

    // Initialize touch point state
    p = new Point({ x: 0, y: 0, canvas: canvas })

    document.getElementById("rect_tool_btn").addEventListener("click", throttle(function(e){
      const $target = e.target.closest(".tool-btn"),
        active = ($target.dataset.active==="true");
      $target.dataset.active = !active;
      toggle_shape_handlers(!active);
    }, 50));
    document.getElementById("selector_tool_btn").addEventListener("click", throttle(function(e){
      const $target = e.target.closest(".tool-btn"),
        active = ($target.dataset.active==="true");
      $target.dataset.active = !active;
      toggle_selector_handlers(!active);
    }, 50));

    …
  };
We will focus first on the add-rectangle (⊞) button. The click event handler will update the data-active attribute on the
button to reflect the active (inactive) state of the button. It will also enable (disable) some handlers on the canvas element through the
toggle_shape_handlers function:
  const drop_rect = function(point){
    let rect = new ResizableDraggableRectangle({
      x: point.canvas_x,
      y: point.canvas_y,
      canvas: canvas});
    all_rectangles.push(rect.draw());
  };

  const shape_mouseup = function(event){
    event.preventDefault();
    p.x = event.pageX;
    p.y = event.pageY;
    drop_rect(p)
  };

  const toggle_shape_handlers = function(on) {
    const method = on ? canvas.addEventListener : canvas.removeEventListener;
    method.call(canvas, 'mouseup', shape_mouseup);
  };
We can see that, on activation, the toggle_shape_handlers function will add an event listener for mouseup
events on the canvas. In response to such events we record the position of the event using our intermediary Point object
and call the drop_rect function, which instantiates a ResizableDraggableRectangle at the point of interaction.
This Rectangle object created is also appended to the all_rectangles array, such that the SHAPE
module can keep track of all Rectangles which have been added to the canvas.
Looking now at the select-rectangle button (☞). The click handler will, again, toggle the state of the button and will then call
toggle_selector_handlers to enable this functionality:
  const toggle_selector_handlers = function(on){
    all_rectangles.forEach(function(rect){
      rect.toggle_handlers(on);
    });
  };
We can see that this function will simply loop over the all_rectangles array and call toggle_handlers on each
of the ResizableDraggableRectangle instances we have created. Let's take a look at what is inside these custom rectangle classes.
Rectangle class
Our index.html page loads the js/shape.js script, but we also load js/rectangle.js.
This script defines some custom Rectangle classes which we use to encapsulate the display and behaviour of the
rectangles on our canvas. We start with the base Rectangle class:
class Rectangle {
  constructor({x, y, width=null, height=null, canvas}={}) {
    this.x = x;
    this.y = y;
    this.width = width || this.default_width;
    this.height = height || this.default_height;
    this.orig_canvas = canvas;
    this.orig_context = canvas.getContext('2d');
    this.canvas = null;
    this.ctx = null;
    this.is_active = false;
    this.p = null;
  }

  …

  draw({width=null, height=null, fill=false}={}) {
    if(!this.canvas){
      this.canvas = document.createElement("canvas");
      this.canvas.width = this.orig_canvas.width;
      this.canvas.height = this.orig_canvas.height;
      this.orig_canvas.parentNode.insertBefore(this.canvas, this.orig_canvas.nextSibling);
      this.ctx = this.canvas.getContext("2d");
      this.ctx.lineWidth = this.orig_context.lineWidth;
      this.ctx.strokeStyle = this.orig_context.strokeStyle;
      this.p = new Point({x: this.x, y: this.y, canvas: this.canvas});
    }

    // Draw rect with default size
    this.ctx.beginPath();
    this.ctx[fill ? 'fillRect' : 'strokeRect'](
      this.x-this.width/2,
      this.y-this.height/2,
      width || this.width,
      height || this.height
    )
    return this;
  }

  destroy(){
    this.clear();
    this.canvas.parentNode.removeChild(this.canvas);
  }

  hit(point) {
    return point.canvas_x >= (this.x-this.width/2) &&
      point.canvas_x <= (this.x+this.width/2) &&
      point.canvas_y >= (this.y-this.height/2) &&
      point.canvas_y <= (this.y+this.height/2);
  }

  clear() {
    this.ctx.clearRect(0, 0, this.canvas.width, this.canvas.height);
  }
}
There is quite a bit here, so to keep the discussion concise lets summarise the main methods exposed.
The consturctor takes the position and dimensions of the rectangle (in canvas coordinates), along with
a reference to the parent canvas. It stores this canvas reference in the member orig_canvas and the drawing context on
this canvas in orig_context.
We use an is_active flag on the rectangle to track when this instance has been selected and we initialize
the canvas, context and p member variables to null.
The idea is that we will set up a new canvas element for each rectangle that we draw.
Using a separate canvas for each rectangle will allow us to keep each rectangle isolated so we can, for example, select a
rectangle for deletion. But before we delete rectangles we have to talk about how we draw them.
The draw method will first check if the canvas member has been set. If not, a new
canvas element is created with the same dimensions and properties as the parent canvas. The new canvas is appended to the DOM
directly after the parent canvas. We rely on CSS positioning to overlay these canvases on top of one another. With the
canvas and drawing context (ctx) set, the rectangle is drawn to the canvas using either the
ctx.fillRect or
ctx.strokeRect
methods.
These methods are offered natively on the canvas drawing context and will cause the actual rectangle (filled or outline) to be drawn on
the canvas. The parameters passed to these methods will dictate the coordinates of the top-left corner of the rectangle,
(x,y), along with its width and height.
The clear method will remove the rectangle by simply clearing the entire canvas. This is possible
owing to the fact that the rectangle has its own canvas. The destroy method goes one step further
by actually removing the canvas element entirely. We will use clear when we intend to redraw the same rectangle
(e.g. resized or repositioned), whereas the destroy method will be called when the user actually requests deletion of
the rectangle.
Finally the hit method takes a Point object and returns true if the point object lies within
the boundary of the rectangle on the canvas, otherwise it will return false. This will be a very important method in what follows as
it will be used to determine if a particular Rectangle has been activated by a click or touch event.
DraggableRectangle class
So we have defined a Rectangle class to represent and draw our rectangle on the canvas. We will subclass the
Rectangle to add some behaviours which will allow the user to manipulate the rectangle. Enter our
DraggableRectangle class:
class DraggableRectangle extends Rectangle {
  constructor({x, y, width, height, canvas}={}) {
    super({x, y, width, height, canvas);
    this.mousemove = throttle(this._mousemove.bind(this), 50);
    this.touchmove = throttle(this._touchmove.bind(this), 50);
    this.touchstart = this._touchstart.bind(this);
    this.mouseup = this._mouseup.bind(this);
    this.mousedown = this._mousedown.bind(this);
    this.dragging = false;
  }
  …
The constructor for our DraggableRectangle takes the same parameters as the base Rectangle
class and also sets up the boolean dragging flag which we will use to reflect when our rectangle is in the process
of being dragged. We also set up member variables to reference bound and throttled touch handler functions. This is convenient
to avoid having to think about throttling or execution context in subsequent methods.
Before we talk about how the user can manipulate a rectangle on the canvas we need to allow the user to select a rectangle
to work with. As we saw in the SHAPE initialization above, when the selector-tool is chosen we toggle the handlers
on each recangle. The toggle_handlers method on the DraggableRectangle attaches a set of touch
and mouse event-handlers. Note that these handlers are attached to the parent/original canvas, and a similar
set of handlers are attached for each rectangle we have:
  toggle_handlers(on) {
    const method = on ? this.orig_canvas.addEventListener.bind(this.orig_canvas) :
      this.orig_canvas.removeEventListener.bind(this.orig_canvas);

    // Handling touch events
    method('touchstart', this.touchstart, false);
    method('touchmove', this.touchmove);
    method('touchend', this.mouseup);

    // Handling mouse events
    method('mousedown', this.mousedown, false);
    method('mousemove', this.mousemove);
    method('mouseup', this.mouseup);
  }
The contents of these handlers should look pretty familiar from Part I,
as we are reusing similar handlers to the ones used to track the pencil drawing operations. Let's take a quick look at the mouse event handlers, and we will start with the
_mousedown handler
  _mousedown(event) {
    event.preventDefault();
    this.p.x = event.pageX;
    this.p.y = event.pageY;
    this.select(this.p)
    this.dragging = this.is_active;
  }

  select(point) {
    if(this.hit(point)){
      this.set_active();
    }else{
      if(this.is_active){
        this.unset_active();
      }
    }
  }

  set_active(){
    this.is_active = true;
    this.clear();
    this.with_colour("red", this.draw.bind(this));
  }

  unset_active(){
    this.is_active = false;
    this.clear();
    this.draw();
  }
The _mousedown event will capture the start of the interaction. It relies on the select method which, when given a point
on the canvas, will decide if the point lies within the rectangle. If it does, then the set_active method is called on the rectangle instance.
If the point of interaction lies outside of this rectangle, and the rectangle is currently active, then the unset_active method will be called
on the current rectangle. Setting a rectangle as active will simply set the this.is_active flag and will redraw the rectangle in red. If a given
rectangle is deemed to be active the _mousedown event will also set the this.dragging flag to true, i.e. we infer that
we have started a dragging action.
Actually dragging the rectangle requires that we redrawn the active rectangle on the mousemove event:
  _mousemove(event) {
    event.preventDefault();
    this.p.x = event.pageX;
    this.p.y = event.pageY;
    if(!this.dragging){
      return;
    }
    this.move(this.p);
  }

  move(point) {
    this.clear();
    this.x = point.canvas_x;
    this.y = point.canvas_y;
    this.draw();
  }
Importantly, if the current rectangle is not flagged as dragging then the event handler will exit early. This is what will
happen for the listeners on all the non-active rectangles on the canvas. If the rectangle instance is flagged as
dragging we call the move method, which just sets the canvas point to match the mouse event and
redraws the rectangle.
Finally, the mouseup event is used to terminate the dragging event by setting the dragging flag to false
and calling the move_end method. In the general case this move_end event is a no-op, as shown.
If the current rectangle isn't being actively dragged we will use the select method again, to potentially activate the
rectangle if the mouse event coincides with the rectangle postiiton on the canvas.
  _mouseup(event) {
    event.preventDefault();
    this.p.x = event.pageX;
    this.p.y = event.pageY;
    if(this.dragging){
      this.dragging = false;
      this.move_end(this.p);
    }else{
      this.select(this.p)
    }
  }

  move_end(point){
    //No-op
  }
ResizableDraggableRectangle class
We have a draggable rectangle, we now want to be able to resize it. We need to offer some way for the user to indicate that they intend to resize,
rather than drag. There are a number of ways this can be represented in a user-interface. Holding a key (e.g. <Shift>) whilst dragging could be one option
for mouse users, but this would not work so well on touch-only devices. The other option is to offer some clickable area that acts like a handle, which
you need to grab before you start to resize. I opted to go with this second approach. Once an rectangle is selected to be active we
will redraw the rectangle with these resize handles. The user will need to drag the handles in order to resize the parent rectangle.
class ResizableDraggableRectangle extends DraggableRectangle {
  constructor({x, y, width, height, canvas, handle_size=6, handle_margin=7}={}) {
    super({x, y, width, height, canvas});
    this.resize_handles = [];
    this.handle_size = handle_size;
    this.handle_margin = handle_margin;
  }

  set_active(){
    this.dispatch_event();
    this.is_active = true;
    this.clear();
    this.with_colour("red", function(){
      this.draw();
      this.draw_drag_handles();
    }.bind(this));
  }

  dispatch_event(){
    const active_event = new CustomEvent('active', { detail: this });
    this.orig_canvas.dispatchEvent(active_event);
  }
  …
The ResizableDraggableRectangle constructor takes the same parameters as a regular Rectangle, along
with a couple of optional parameters to define the size and position of the resize handles. The constructor also initializes the resize_handlers
member variable to be an empty array.
This subclass of DraggableRectangle will override the set_active method to change it in two significant ways. The first change
requires a little diversion. The new set_active method will call dispatch_event, which is responsible for dispatching a custom
active event to our parent canvas and passing the current rectangle in the payload of said event.
The SHAPE module keeps a track of all_rectangles which we have drawn to the canvas. The CustomEvent which
we instantiate and dispatch to the parent canvas, is intended to communicate that the active rectangle has changed. Within SHAPE.init
we have a corresponding listener which is responsible for removing the handlers associated with the resize handles when a rectangle becomes deactivated:
window.SHAPE = (function(s){
  s.init = function(){
    …
    canvas.addEventListener('active', function(event){
      const active_rect = event.detail;
      all_rectangles.forEach(function(rect){
        if(rect!==active_rect){
          rect.destroy_resize_handles();
        }
      });
    });
  }
}({}))
After this diversion, the second change we see in the set_active method is that it will cause a redraw of the rectangle, as before, but it will also invoke the
draw_resize_handles method to cause these resize handles to become visible. The draw_resize_handles method looks like this:
  draw_resize_handles(){
    const that = this;
    this.destroy_resize_handles();
    this.resize_handles = [
      [this.x, this.y-this.height/2-this.handle_margin, function(x){ return that.x; }, function(y){ return Math.min(y, that.y); }, -1],
      [this.x, this.y+this.height/2+this.handle_margin, function(x){ return that.x; }, function(y){ return Math.max(y, that.y); }, +1],
      [this.x-this.width/2-this.handle_margin, this.y, function(x){ return Math.min(x, that.x); }, function(y){ return that.y; }, -1],
      [this.x+this.width/2+this.handle_margin, this.y, function(x){ return Math.max(x, that.x); }, function(y){ return that.y; }, +1]
    ].map(function(args){
      return new ResizeHandle({
        x: args[0],
        y: args[1],
        clamp_x: args[2],
        clamp_y: args[3],
        drag_direction: args[4],
        rect: that,
        size: that.handle_size
      });
    });
  }
This might look a bit complicated so let's break it down. This method will first call destroy_resize_handles
to get rid of any existing resize handles. We then create four handles, one on each side of the parent rectangle. We do this by
looping over an array of arrays, where each sub-array defines the parameters that we will pass to one of our ResizeHandle
instances. But what does this ResizeHandle class look like.
ResizeHandle class
Consider how we want our resize handle will behave: we want to provide an element that the user can drag which will then lead to a
resize of the parent rectangle. You will appreciate that some elements of this interaction have already been captured in our
ResizeHandle will extend
this existing class.
class ResizeHandle extends DraggableRectangle {
  constructor({x, y, size=6, rect, clamp_x, clamp_y, drag_direction=1}={}) {
    super({ x, y, width: size, height: size, canvas: rect.orig_canvas });
    this.clamp_x = clamp_x;
    this.clamp_y = clamp_y;
    this.rect = rect;
    this.drag_direction = drag_direction;
    this.ctx = rect.ctx
    this.draw({fill: true});
    this.toggle_handlers(true);
  }
  …
As for a regular rectangle, the ResizeHandle is constructed with x and y coordinates, but we use a single
size dimension as the handles will be square. The drag behaviour for the resize handles will be modulated by two funcations
which you pass on construction. The clamp_x function will restrict how the x-coordinate of our ResizeHandle is allowed
to change, similarly with the clamp_y. Finally the drag_direction parameter, which should take a value of ±1, will
reflect the orientation of our increasing resize action. Let's look at a picture to help understand the parameters we are passing to build one of these resize
handles.
As an example let's consider the third element in our array-of-arrays. This will contribute to the constructing of the left-hand resize handle:
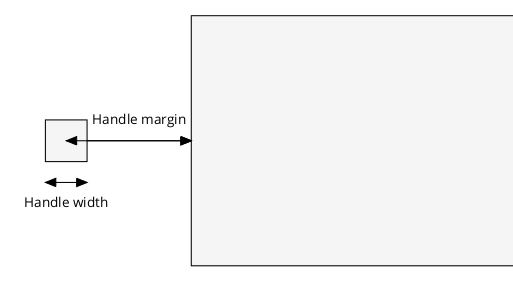
In this case we are creating our resize handler as follows:
      return new ResizeHandle({
        x: this.x-this.width/2-this.handle_margin,
        y: this.y,
        clamp_x: function(x){ return Math.min(x, that.x); },
        clamp_y: function(y){ return that.y; },
        drag_direction: -1,
        rect: that,
        size: that.handle_size
      });
You can see that we set the y-coordinate of our handle to be the same as the parent rectangle in this case, and the
x-coordinate will be set relative to that of the parent rectangle, with reference to the parent width and the margin we
want to place between the parent and the resize handle, specifically: this.x-this.width/2-this.handle_margin.
You will also notice that by dragging our handle to the left, i.e. in the direction of decreasing x, we will be making our parent
rectangle larger, for this reason we assign a drag_direction of -1 in this case. Importantly, we also need to keep a reference
to the parent rectangle to which this resize handle belongs. This is passed in the rect parameter and will be
stored on the ResizeHandle instance in the rect member variable.
To understand the role of the clamping functions we need to consider how we expect this resize handle to behave. The user will select the
handle and drag outwards/inwards to resize the parent rectangle in the horizontal direction. So we want the handle to slide in and out in
the horizontal direction, but we don't want it to move vertically. The clamp_x and clamp_y functions apply a
modulation to the drag movements in the x and y directions.
In this case we want to lock our vertical motion completely so we specify clamp_y as function(y){ return that.y; }.
This clamping function will always return the y-coordinate of the parent rectangle.
The horizontal motion is modulated by clamp_x as follows: function(x){ return Math.min(x, that.x); }. This allows free motion
of the x-coordinate, provided it remains smaller than the x position of the parent rectangle. I.e. we can only slide our handle
to the left of our parent rectangle.
So we have seen how we construct a ResizeHandle, we also need to understand how this class differs from an ordinary
DraggableRectangle, where do the clamp_* functions and drag_direction factor into
behaviours? As discussed, we aim to reuse much of the drag behaviour and handlers that we have already defined, but we will allow
our ResizeHandle class to diverge when we call the move(point) method. We will override this method
as follows:
  move(point) {
    this.clear();
    const x_orig = this.x, y_orig = this.y;
    this.x = this.clamp_x(point.canvas_x);
    this.y = this.clamp_y(point.canvas_y);

    // Work out new dimensions of rect based on movement of drag handle
    this.rect.x = this.rect.x+0.5*(this.x-x_orig);
    this.rect.y = this.rect.y+0.5*(this.y-y_orig);
    this.rect.width = this.rect.width+this.drag_direction*(this.x-x_orig);
    this.rect.height = this.rect.height+this.drag_direction*(this.y-y_orig);
    this.rect.clear();
    this.rect.draw();
  }
Previously this move method would set the x- and y-coordinates of the rectangle,
based on the Point parameter, then redraw. For the resize handles we will only set the x- and
y-coordinates after passing the interaction coordinates through our clamping functions.
As well a setting the new position of our handle we also want to actually resize the parent rectangle. This is
achieved by manipulating the this.rect reference. We calculate and set a new width, height and position
for our parent rectangle based on how the x- and y-coordinates of our drag handle has changed.
With these new attributes set for the parent rectangle we trigger a redraw.
The ResizeHandle class forms the final piece of our puzzle. Our drawing tool should now allow us to activate the
rectangle button then drop one or more rectangles on to the canvas. We can also use the selector-button to allow us to select a
particular rectangle, allowing us to drag it round the canvas or resize by dragging on the resize handles. Done.
Summary
This has been a long post, the concept was pretty simple but implementing the idea was actually pretty involved.
To recap, we wanted to offer the ability to add rectangles to our canvas which we could then reposition and resize accordingly.
The native canvas methods used in this tutorial have been pretty limited: just fillRect and
strokeRect. The behaviour was achieved, mainly, through the introduction of a number of custom-built
Rectangle classes:
- The
DraggableRectangledefined the core logic for handling user select and drag interactions. -
The
ResizeHandleclass clamped these drag actions and held a reference to a parent rectangle, which was also updated after a drag event. -
The
ResizableDraggableRectangletook aDraggableRectangleand embellished it with 4ResizeHandlerinstances to control its resize in different directions.
I hope this has been useful. In Part III we will look at adding a background image to our canvas, which we can then annotate with our existing drawing tools. We will also look at exporting our creation in an image format. Subscribe to the mailing list to get notified when then next tutorial becomes available.
References
- You can access a hosted version of the drawing tool here
- The GitHub repo to accompany this series of blog posts
- The version of the tool built in this tutorial can be found on this branch
- The revealing module pattern for modular Javascript
- MDN docs for CanvasRenderingContext2D.strokeRect
- MDN docs for CanvasRenderingContext2D.strokeRect
Comments
There are no existing comments
Got your own view or feedback? Share it with us below …