
Introduction
Regardless of the framework or approach that you adopt, when developing a web application locally there are many sound reasons to serve your local application over SSL, [1].
One of the primary motivations is to ensure consistency between your development and production environments. Any disparity between environments will leave gaps where unexpected behaviours will fester; mixed-content warnings in production, service workers not running in development, and more. In this article we will examine loading of service workers from our local environment, running on a custom domain.
Service workers [2] are a relatively modern utility on the web platform which aim to offer some native-like functionalities, such as offline behaviour and push notifications. For security reasons service workers can only be loaded over HTTPS, which may pose a problem for your local development if you are running over HTTP.
With these motivations, let's see how we can get our new Rails app running over HTTPS.
Serving Rails over SSL
We will start with a new Rails application, rails-over-ssl. You can checkout the source code for this project on GitHub,
but we will steer you through the main parts below:
> rails new rails-over-ssl
> cd rails-over-ssl
> bundle install
>  bin/rails server
=> Booting Puma
=> Rails 7.0.4 application starting in development
=> Run `bin/rails server --help` for more startup options
Puma starting in single mode...
* Puma version: 5.6.5 (ruby 3.1.1-p18) ("Birdie's Version")
*  Min threads: 5
*  Max threads: 5
*  Environment: development
*          PID: 9070
* Listening on http://127.0.0.1:3000
Use Ctrl-C to stop
If we now navigate to http://localhost:3000 we can see the Rails landing page, telling us that our project has been successfully setup.
We want to replace this landing page with our own simple page that will install a service worker script. So let's add a new route to config/routes.rb:
Rails.application.routes.draw do
  root "articles#index"
end
We will also set up the corresponding controller action in app/controllers/articles_controller.rb, which will just carry out the default behaviour of
rendering the corresponding index.html.erb template:
class ArticlesController < ApplicationController
  def index
  end
end
Interestingly, we don't even need to define the index action in this controller. In it's absence, the default Rails behaviour is to automatically render
the corresponding template, namely app/views/articles/index.html.erb:
<script>
  const registerServiceWorker = async () => {
    if ("serviceWorker" in navigator) {
      try {
        const registration = await navigator.serviceWorker.register("/sw.js", {
          scope: "/",
        });
        if (registration.installing) {
          console.log("Service worker installing");
        } else if (registration.waiting) {
          console.log("Service worker installed");
        } else if (registration.active) {
          console.log("Service worker active");
        }
      } catch (error) {
        console.error(`Registration failed with ${error}`);
      }
    }
  };

  registerServiceWorker();
</script>
<h1>Welcome</h1>
<p>
  I am registering a service worker on this page …
</p>
<ul id="output">
</ul>
In order to use a service worker it first needs to be registered with the browser. We have included the registration code inline in the ERB template above.
This registration code first checks for the support of the serviceWorker property on the Navigator object and, providing it
is supported, we call the register method, passing in the path to our service worker script, sw.js. The remainder of the
script just logs the success of the registration operation.
We now need to create our service worker script, sw.js, which is referenced in this registration. This script should be placed at
public/sw.js:
self.addEventListener("install", (event) => {
  event.waitUntil(() => {
    console.log("Installing our service worker.");
  });
});

 // Allow sw to control current page
self.addEventListener("activate", (event) => {
  console.log("Claiming clients for current page");
  event.waitUntil(self.clients.claim());
});
At present we are not focussing on the usage of service worker scripts, but rather on the fact that they must be served over SSL. As a result, the script above is deliberately straight forward. Our service worker will respond to two lifecycle events:
-
install: This event is fired when the service worker script is first loaded and installed. -
activate: After installing the service worker this event fires, allowing us to tidy up resources from previous service worker registrations (e.g. clear out caches) and switch open clients to be controlled by the new service worker.
We simply log a message when these two events are fired. Identifying these log messages is enough for us to know that our service worker script has been successfully loaded.
Once a service worker has been loaded and installed, these events will not be fired again on subsequent visits to the page. If you want to trigger a reinstall of the service worker
you will need to unregister it and reload the page. In Chrome you can unregister a service worker via the Application > Service Workers menu in DevTools, i.e.:

Application > Service Workers
Loading our service worker on localhost
The good news is that if we are running our application on localhost then service worker loading just works. This is because browsers treat localhost as a
special case. It is considered as a secure origin even when HTTP is used, with the goal of facilitating local development. Hence, if we load the root-page of our Rails app,
http://localhost:3000, we see the successful registration of our server worker logged to the console:

http://localhost:3000.
However, as soon as we see the term special case in the preceding paragraph we should be on high-alert. The very goal of environment parity, discussed at the
top of the article, is being called into question. If we are relying on behaviour that requires that our application runs over localhost this should make us feel
uncomfortable. So let us conclude that we are not happy to rely on the special behaviour of localhost, what other options do we have?
Running our application over ngrok
Ngrok [4] is a fantastic service that allows you to expose a locally running process to the wider internet, by means of an
SSH tunnel. We run our Rails server on localhost:3000 as before, with one small change. We now need to tell our server that it should allow requests from
ngrok subdomains. To do that we should add the following line to our development config in config/enviornments/development.rb. Take note of the dot
(.) prefix which will include all subdomains in the allow-list:
Rails.application.configure do
  …
  config.hosts << ".eu.ngrok.io"
end
We now run the ngrok agent from the command line. We want to tell ngrok to set-up a secure public URL which will forward traffic to our web server running on port 3000.
This is difficult enough to express in words, but ngrok couldn't make it any simpler to set up:
> ngrok http 3000
When ngrok starts up it will print out the URL which can be used to access your local web server, in this case it is
https://1224-2a00-23c4-f9a4-7c01-529-4c86-e069-6c35.eu.ngrok.io:

If we now hit this public ngrok URL the request will be forwarded to our local webserver and, as we are running over HTTPS, the service worker will install and activate with no errors:

With the help of ngrok we are now running our local development environment over HTTPS, with service worker loading as expected. This may be good enough for your purposes, but there are a couple of limitations/drawbacks with this approach:
- The public URL generated by ngrok is not very pretty, nor memorable
- Within the ngrok free plan these URLs are only guaranteed to be valid for a limited time (I think this is stated as 2 hours, but in practice it seems to be much longer)
- Restarting the ngrok agent (e.g. when we reboot) will cause the public URL to change
-
Following from the previous points, for development convenience we have we increased our security exposure by allow-listing all ngrok subdomains
(i.e.
config.hosts << ".eu.ngrok.io"). The alternative is to remember to update this config each time we have a new ngrok subdomain to access our development environment.
What we would really like is to run our development application over a fixed custom subdomain, e.g. https://dev.vector-logic.com:3000, avoiding these ugly and
constantly-changing ngrok subdomains.
It should be pointed out that ngrok does offer support for this on the paid plan, but this will require configuration within your ngrok account and also will require configuration of DNS records for the subdomain in question. This may not suit for several reasons: perhaps you don't have access to the DNS records for the domain, perhaps you want to avoid paying for any additional subscriptions or perhaps you just want to avoid configuring the additional moving parts. For any of these cases, let's see if we can set something up locally to allow us to run our Rails server from a custom subdomain, over SSL.
Running on a custom subdomain
First off, let's suppose we don't have access to the DNS zone for the domain so we need to set up our /etc/hosts file to resolve our custom subdomain. In our
hosts file we will ensure the the subdomain resolves to our local web server. We add the following to /etc/hosts
[5]:
127.0.0.1	localhost
…
127.0.0.1       dev.vector-logic.com
Next we will need to add our custom subdomain to our Rails configuration for allowed hosts. We update config/environments/development.rb to add the following:
Rails.application.configure do
  …
  #config.hosts << ".eu.ngrok.io"
  config.hosts << "dev.vector-logic.com"
end
If we restart our server and attempt to access the application on http://dev.vector-logic.com/ we will successfully hit our server and load the page, but the
service worker script will fail to load as we are no longer running over SSL.
If following these examples you may find yourself trying to jump between executing HTTP and HTTPS requests. Unfortunately Chrome does not make this easy owing to its
security and caching features, [6]. Once you have visited the HTTPS version of a domain (or subdomain) Chrome will
remember this and will automatically rewrite any attempts to access the same domain over HTTP to, instead, use HTTPS.
Whilst one can see how this could prevent inadvertent use of the HTTP protocol, in our case, where we explicitly want to use HTTP, this is an enormous pain in the
ass. We can work around the problem by visiting chrome://net-internals/#hsts and deleting the domain security policies for our custom subdomain.
See this blog post for more details.
So let's switch to running our application over SSL. We start by adding the force_ssl config in Rails. This config setting will do a number of things to harden our application
for delivery over SSL, including:
- Redirection of any HTTP requests to corresponding HTTPS endpoints
- Setting the
secureflag on cookies, instructing browsers to only send them over HTTPS connections - Sets the HTST header to instruct browsers that they should only use HTTPS for this domain
We will set the force_ssl flag in the config/environments/development.rb file, based on the value of an environment variable (WITH_SSL)
that we can specify when we start up the Rails server:
Rails.application.configure do
  …
  config.force_ssl = (ENV['WITH_SSL']=="true")
end
To boot our Rails server in SSL-mode we can then do the following:
> WITH_SSL=true bin/rails server
If we boot our server now, and try to access the root path https://dev.vector-logic.com:3000 we will not have any joy, and we will see an error like the following in the Rails logs:
2022-11-27 22:01:39 +0000 HTTP parse error, malformed request: #
This is unsurprising, we haven't told our puma application server that we are handling SSL requests, in particular we haven't configured puma with the SSL
cert and private key that should be used for the encrypted HTTPS communication. So where do we get these certificate details from? At this point we have two options:
- Use an established Certificate Authority (CA) to generate our certificates.
- Generate our own self-signed cerficates
The first option includes both paid certificates (from the likes of DigiCert, Sectigo etc.) or free certificates from LetsEncrypt. But in either case you will have some additional configuration to carry out in order to prove that you are the owner of the domain for which you are requesting the cerficate. For this reason we are going to explore option 2.
Generating self-signed certificate
In this section the process is outlined with respect to a Ubuntu 20.04 development environment, making use of the openssl command-line tool.
The tools and steps should translate over to other operating systems, but if you are looking for some more
details you might find some help in [8].
There are a few steps that we will need to follow in order to generate our own SSL certs which the browser will accept:
- Generate a key and root certificate (
.pem) for our own personal Certificate Authority - Generate a certificate-signing request (
.csr) for the subdomain we wish to certify - Use the key and root certificate from step 1 to generate a certificate (
.crt) based on the CSR - Update our puma config with the certificate we have just generated and the corresponding private key from step 2
- Import the root certificate (step 1) into the browser, so that it recognises us as a legitimate Cerficate Authoridy
Before we proceed, we will create a new directory to store the files that are generated during this process, and then move into that directory before executing the following steps:
> mkdir config/ssl
> cd config/ssl
So we have listed the high-level steps above; with some thanks to [7] we present the details:
-
Genreate root certificate
In order for our certificates to be trusted by the browser they need to be signed by a Certificate Authority, so the first thing we need to do is to set ourselves up as a CA. We generate a secret key, then use that to generate the root certificate for our CA:
openssl genrsa -des3 -out my_cert_authority.key 2048  # Generate private key
openssl req -x509 -new -nodes -key my_cert_authority.key -sha256 -days 825 -out my_cert_authority.pem  # Generate root certificate
When you execute the second step above, to generate the certificate, you will be prompted location and organisation details. You can skip these questions or input dummy values as they are not important for our intended usage.
-
Genreate CSR
In order to generate a SSL cert for our target subdomain (i.e.
dev.vector-logic.com) we will create a new key and a certificate-signing request (CSR). The key will be used as part of the encryption mechanism later. The CSR is the entity that you would typically create and send on to the Certificate Authority when you are requesting a new SSL certificate. The CA then use this CSR to generate your certificate.openssl genrsa -out dev.vector-logic.key 2048 # Generate a private key for the subdomain we want to use (e.g. dev.vector-logic.com) openssl req -new -key dev.vector-logic.key -out dev.vector-logic.com.csr # Create a certificate-signing requestdev.vector-logic.comin theCommon Namefield may be useful for your own future identification. -
Genreate SSL cert
In our case we are also the Certificate Authority, so we need to pass the CSR generated in the previous step over to ourselves. Thank you very much.
We now use the key and root certificate which we produced in step 1, along with the CSR just created, to generate the new certificate for
dev.vector-logic.com.# Create the signed certificate openssl x509 -req -in dev.vector-logic.com.csr -CA my_cert_authority.pem -CAkey my_cert_authority.key -CAcreateserial \ -out dev.vector-logic.com.crt -days 825 -sha256 -extfile dev.vector-logic.com.extYou can see that this command also references an
.extfile, which holds some config for the process. You will need to create a filedev.vector-logic.com.extwith the following contents:authorityKeyIdentifier=keyid,issuer basicConstraints=CA:FALSE keyUsage = digitalSignature, nonRepudiation, keyEncipherment, dataEncipherment subjectAltName = @alt_names [alt_names] DNS.1 = dev.vector-logic.com # Be sure to include the domain name here because Common Name is not so commonly honoured by itselfSo we now have a valid SSL cert (
dev.vector-logic.com.crt) and corresponding private key (dev.vector-logic.key) which can be used together to encrypt/decrypt our HTTP traffic. -
Configure local web server
Now we need to let our puma web server know where to find our new certificate, and we do that by adding the following to the end of
config/puma.rb:if ENV['WITH_SSL'] ssl_bind '0.0.0.0', 3001, { key: "./config/ssl/dev.vector-logic.com.key", cert: "./config/ssl/dev.vector-logic.com.crt", verify_mode: 'none' } endYou will notice that we have referenced the environment variable
WITH_SSL. If this flag is not set our webserver configuration is unaltered. In the event that the environmental flag is set we configure puma to listen for SSL traffic on port 3001, and we configure the key and certificate that puma should use to encrypt/decrypt that traffic. -
Import root certificate to browser
At this point if we restart our Rails server (
WITH_SSL=true bin/rails server) and browse tohttps://dev.vector-logic.com:3001, the page will be loaded over SSL, but our service worker script will still fail to load and we will likely receive a browser warning:![]()
Using self-signed cert continues to generate browser warnings as Chrome does not trust our Certificate Authority. Service workers will fail to load in this case. The problem is that, whilst we have set up SSL certs for our local application, the browser does not recognise the Certificate Authority that has signed the certificate. We resolve that problem by telling our browser to trust the Certificate Authority we have just set up. I outline the steps for Chrome here, but other browsers will offer similary functionality for importing certificates from trusted sources.
Navigate to the Certificates section of Chrome Settings:
chrome://settings/certificates. Go to the Authorities tab and then click the Import button. This should open a file explorer which you can use to find and upload the root certificate which you created in step 1 above.![]()
Importing the root certificate for our new Certificate Authority to Chrome, tells Chrome to trust SSL certs signed by this CA. With this final change we are done! Navigating to
https://dev.vector-loigic.com:3001we can see our local web server running over HTTPS with no browser warnings, and service worker script is loaded as expected.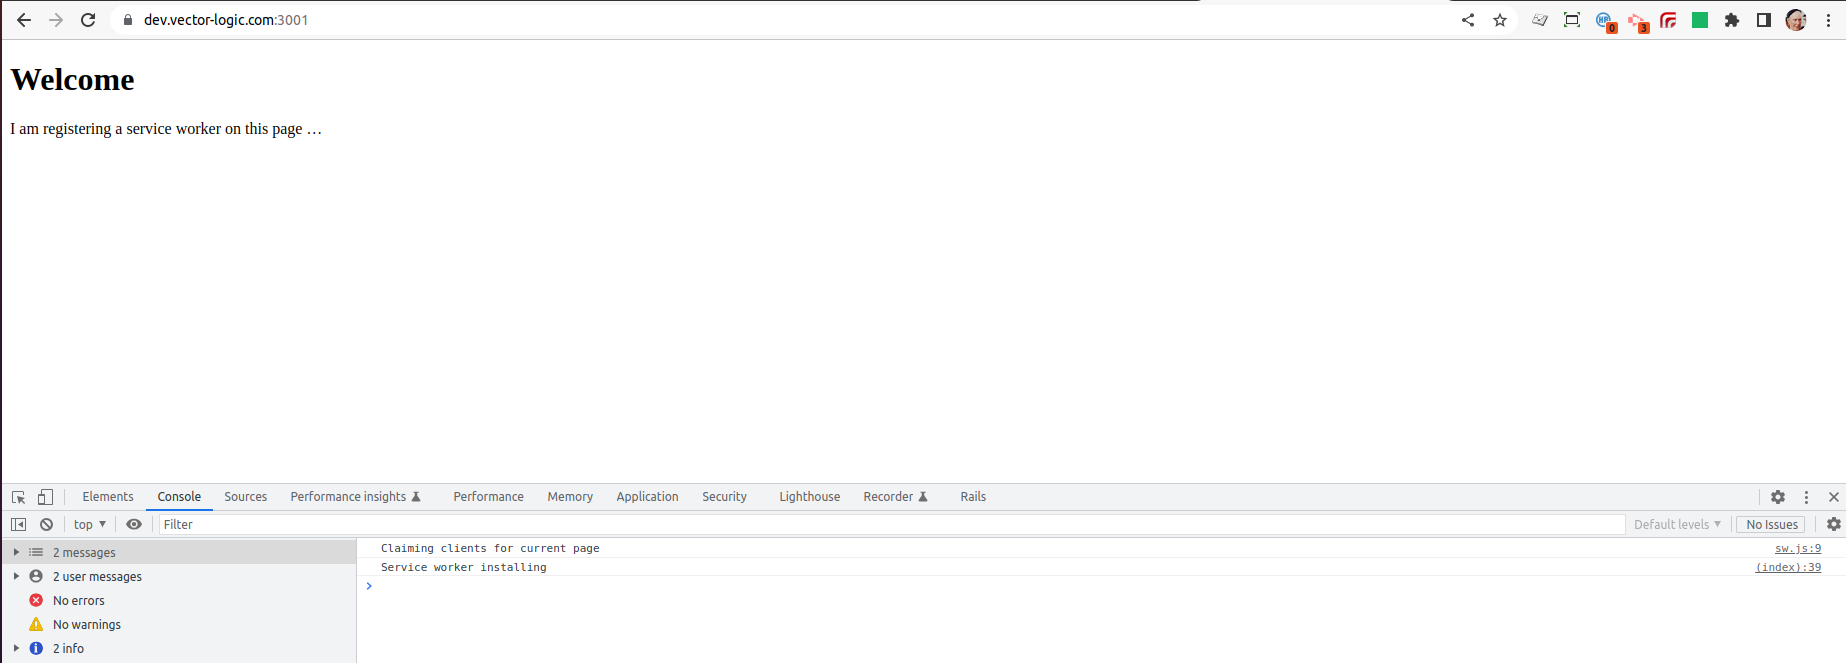
Chrome is happy with the certificate and our service worker script loads.


Conclusion
In this blog post we have tried to tackle the specific problem of running a service worker script in our local development environment. This has led us on a meandering path that has caused us to touch on a variety of very important web development topics, including HTTPS, SSL certificates, localhost, ngrok, the OS hosts file, HSTS and self-signed certificates.
Initially we saw that it was possible to load our service worker script by relying on the special status that is granted by browsers to localhost.
We explained why, on the basis of environmental parity, we may not want to rely on this quirk and we resolved to run our local development environment over HTTPS.
We saw how we can make use of the excellent ngrok to expose our development environment to the internet, via a temporary HTTPS URL.
Whilst ngrok is a fantastic tool, we concluded that our best option would be to run our local dev server using a self-signed SSL certificate. This required that we
generate a root certificate for our own Certificate Authority, and import this root cert to our browser. We then use this root cert (and key) to sign the certificate for the subdomain
we choose to use in development. The subdomain can be set up in our /etc/hosts file to point back to our local machine, and our Rails server can configured with
the details of our newly-minted certificate.
Please reach out with any questions or feedback via the comments section!
If you found this blog post useful, please consider subscribing to our mailing list to be kept updated about future VectorLogic blog posts.
References
- This Auth0 blog discussed some of the reasons why to run SSL in development
- MDN Service Worker docs
- GitHub repo for the
rails-over-sslapplication - Getting started with ngrok
- This is the location of the hosts file for my Ubuntu environment, you may need to research where the equivalent file is located on your OS
- Article discussing how to work around Chrome HSTS caching
- Excellenct StackOverflow answer providing steps to generate your own self-signed certificate
Comments
There are no existing comments
Got your own view or feedback? Share it with us below …